Купили в магазине ноутбук – а он без windows . Не включается. Не из экономии, а что то сейчас с покупкой лицензий и с рестрикциями, да ну их, есть замена.
Надо звать мастера по настройке. ( Он придет с другом, всех повяжут и все вывезут, в квартире останутся только голые стены. Подвозил одного парня, проезжая на Велике, юг Подмосковья. Чем то в него брызнули, больше ничего не помнит. Ключей от дома нет, от машины нет, сильно помятый, оставили в кармане 100 рублей и бросили рядом с дорогой, в 40 км от Чехова, где он жил. Валялся на земле больше суток, хорошо, что живой. Он немножко в себя пришел, но , скорее всего, в доме будет пусто, и машины тоже не будет. а еще Целую компанию так куда то увезли, причем охрана видела – да переезжаем мы.. компьютеры, ксерокс и холодильник видели на базаре..)
Так что обойдемся лучше без компании помошников (грабителей) . Это было в 90-е а сейчас, говорят, повторяется.
перевод описания – как установить систему на компьютер.
я не перевожу все, зовите переводчика. По шагам немножко.
Tutorials
Квак поставить систему на новый компьютер.
Install Ubuntu desktop
1. Overview
What you’ll learn
Сначала прочитать и попробовать изучить – и взять, то нужно. в магазин за usb флешкой или на рынок за dvd – rom возможно придется, смотря какой комп – ноутбук.
In this tutorial, we will guide you through the steps required to install Ubuntu Desktop on your laptop or PC.
What you’ll need
- A laptop or PC with at least 25GB of storage space.
- A flash drive (12GB or above recommended).
можно и планшет, если он поддерживает а не на Андроид. Компьютер новее 2008 года и флешка usb 16 гигабайт.
Whilst Ubuntu works on a wide range of devices, it is recommended that you use a device listed on the Ubuntu certified hardware page. These devices have been tested and confirmed to work well with Ubuntu.
If you are installing Ubuntu on a PC or laptop you have used previously, it is always recommended to back up your data prior to installation.
ну да, если комп не из магазина, сначала с него переписать все. Внешний жесткий диск + провод к нему в магазине.
about 35 minutes to go
© 2024 Canonical Ltd. Ubuntu and Canonical are registered trademarks of Canonical Ltd.
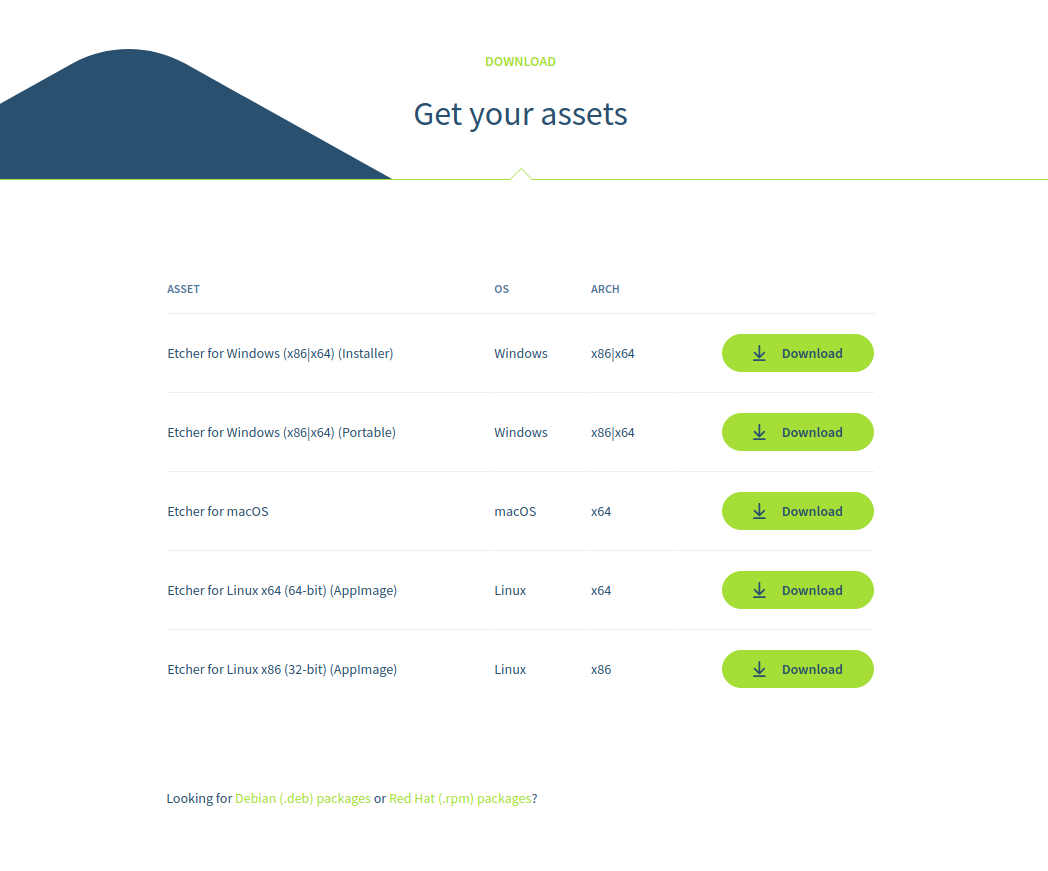
2. Download an Ubuntu Image
Загружаем систему. По мобильному интернету это будет 4 часа и съест весь трафик, так что лучше там, где есть домашний или вайфай. На Акадо по оптике и теле антенне 200 мегабит прибежало меньше , чем за 2 минуты.
You can download an Ubuntu image here. Make sure to save it to a memorable location on your PC! For this tutorial, we will use the Ubuntu 23.04 release which uses the new Ubuntu Desktop installer that will be included in all future Ubuntu releases.
If you are installing an older version of Ubuntu, such as Ubuntu 22.04 LTS, you will find that the visual presentation of the installer is different, but the overall flow should remain the same.

3. Create a Bootable USB stick
самое сложное для начинашек. на самом деле просто. На другом рабочем компьютере подключить флешку. Загрузить программу для загрузки с флешек.
To install Ubuntu Desktop, you need to write your downloaded ISO to a USB stick to create the installation media. This is not the same as copying the ISO, and requires some bespoke software.
For this tutorial, we’ll use balenaEtcher, as it runs on Linux, Windows and Mac OS. Choose the version that corresponds to your current operating system, download and install the tool.
If you prefer to use a different tool to create your USB, we also have tutorials for Rufus on Windows, Etcher on Mac OS and Startup Disk Creator on Ubuntu.
Select your downloaded ISO, choose your USB flash drive, and then click Flash! to install your image.
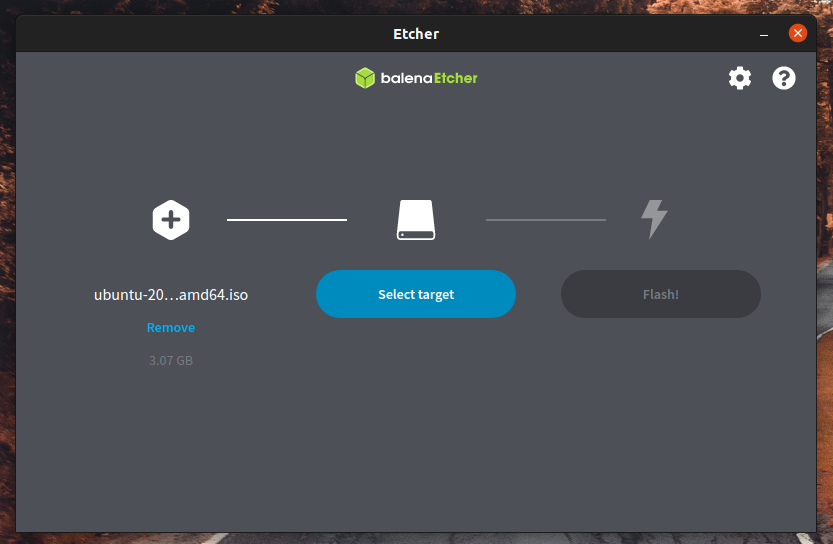
можно выбрать эту программу, а я перекачал Rufus rufus.akeo.ie https://rufus.ie/ru/
на некоторых ноутбуках понадобится dvd привод – встроеный или внешний.
Installing Ubuntu from a DVD
It’s also possible to install Ubuntu from a DVD instead of USB. Follow these guides to burn an Ubuntu installation DVD on Windows, MacOS or Ubuntu, then select the CD drive instead of USB device on the boot options screen in the following step.
загрузка
4. Boot from USB flash drive
Insert the USB flash drive into the laptop or PC you want to use to install Ubuntu and boot or restart the device. It should recognise the installation media automatically. If not, try holding F12 during startup and selecting the USB device from the system-specific boot menu.
F12 is the most common key for bringing up your system’s boot menu, but Escape, F2 and F10 are common alternatives. If you’re unsure, look for a brief message when your system starts – this will often inform you of which key to press to bring up the boot menu.
это тоже может вызвать сложности.
надо подключить флешку Сзади компьютера, на Черный или если есть – Синий разъем usb
(он быстрее, но надо – возможно – попробовать оба)
при включении компьютера – флешка обычно не начнет загрузку, а загрузится операционная система, которая там. Надо в тот момент, когда компьютер включается, секунды через три – после нажатия на кнопку питания – нажать на клавиатуре одну или несколько клавиш, f2 f8 f11 f 12 чаще всего, может быть и F10. и Esc . если что – поискать в Интернете – как зайти в байос bios на конкретном ноутбуке по модели или на материнской компьютера. Варианты бывают еще. Даже – вытащить батарейку на сутки, разобрав устройство и отсоединив аккумуляторы и шнур питания.
при запуске с флешки может появиться меню загрузки.
надо выбрать usb flash drive (usb hdd – uefi usb drive) что больше похоже.
Once the installer has initialised you will be invited to choose your language

And then presented with the option to try or install Ubuntu.
выбор – попробовать запустить с флешки или сразу установить систему.

If you click Try Ubuntu, you can preview Ubuntu without making any changes to your PC. You can return to the installer menu at any time by clicking the Install Ubuntu shortcut on the desktop.
To proceed, click Install Ubuntu.
You will be asked to select your keyboard layout. Once you’ve chosen one, click Continue.

выбрать язык. если определился адаптер wifi -подключить интернет, завести пароль. Лучше – если есть разъем провода – подключиться к модему кабелем Ethernet витой парой, а если нет – раздать на телефоне, подсоединив шнурок usb.
Next you will be asked to connect to wi-fi, this will allow Ubuntu to download updates and third party drivers (such as NVIDIA graphics drivers) during installation. Once you have connected to wi-fi (or chosen to proceed offline) then we can continue to the installation setup.
(Alert) RST is enabled
Some PC’s use Intel RST (Rapid Storage Technology) which is not supported by Ubuntu. If this is the case then you will not be able to proceed beyond this point without disabling RST in the bios menu of your machine. If you encounter this pop-up please visit help.ubuntu.com/rst for more information.

это надо отключать на платах Intel особенно серверных.
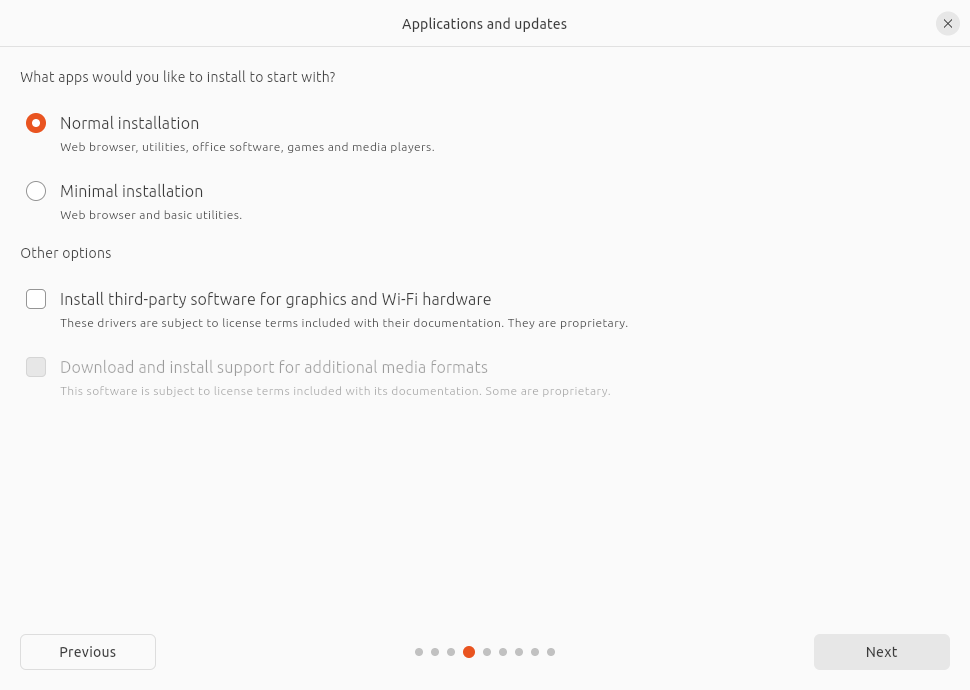
5. Installation Setup
выбрать нормальную установку. Если ну очень старый комп – то минимальную.
You will be prompted to choose between the Normal installation and Minimal installation options. The minimal installation is useful for those with smaller hard drives or who don’t require as many pre-installed applications.
In Other options, you will be prompted to download updates as well as third-party software that may improve device support and performance (for example, Nvidia graphics drivers) during the installation. It is recommended to check both of these boxes.
6. Type of installation
Атеншен плиз две сек внимание – все нужное с компьютера переписано или он новый – выбираем второй пункт – все стереть и поставить Ubuntu.
This screen allows you to configure your installation. If you would like Ubuntu to be the only operating system on your hard drive, select Erase disk and install Ubuntu.
If your device currently has another operating system installed, you will receive additional options to install Ubuntu alongside that OS rather than replacing it.

Let’s take a moment to review all of the above options in detail.+
++ первый вариант оставляет windows и пробует на часть диска установить ubuntu/ так может не получиться, уж лучше купить еще один жесткий диск – ssd советую.
Installing Ubuntu alongside another operating system
If you select this option you will be given a simple interface that allows you to select the drive you want to install Ubuntu on and a slider to determine the amount of disk space you would like Ubuntu to use. The available space is limited by the existing contents of the disk and is designed to avoid overwriting existing files.
This view automatically selects the largest partition on the drive. For more fine-grained control you can switch to the Manual partitioning option that is detailed further down.

программа сама уменьшит раздел винды и выберет 30 гиг для ubuntu . При загрузке можно выбирать систему. Ну это нужно, если за компом – например – работают несколько, или дети играют на Ubuntu или наоборот на Windows. Игры есть и на Linux.
Erase disk and install Ubuntu
If you select this option Ubuntu will take up the entire disk space on the selected drive.

If your PC has multiple hard drives then this option allows you to install Ubuntu alongside an existing OS as long as they each have their own drive. Take care to ensure that you are selecting the right drive in this instance!
если вдруг дисков несколько – надо остановиться и подумать, какой можно потереть – и туда ставить новую систему.
This option also allows you to encrypt your entire drive using LVM. To do this open the Advanced features option before proceeding to the above screen and select ‘Encrypt the new Ubuntu installation for security’

LVM stands for Logical Volume Management. By using LVM during the setup, it makes it easier to create and manage partitions post installation.
+ LVM я ставлю – новая разметка диска. Получилось даже восстановить – через года два работы вырубился свет и диск не загружался. ищем восстановление загрузки LVM. ну а шифровать я не советую, если нет крайней необходимости. На экране правильно.
In the following step you will be prompted to create a Security key that you will need to enter on boot before logging in with your user credentials.

If you select encryption, it is important that you do not lose your security key! Write it down and store it in a safe place outside of your local system. You will not be able to recover your data without it!
Manual partitioning
это уже для тех, кто разбирается . Диск можно разбить и использовать не весь, на новых компьютерах можно весь.
Manual partitioning is designed for advanced users who want to create specific configurations for their use-cases. As such we assume that these users will be comfortable with this interface and will not go into detail during this tutorial on specific setups.
Here users can see all existing drives and partitions and create and manage new partition tables and configurations.

(Alert) Windows BitLocker is enabled
If your device has Windows BitLocker Drive Encryption enabled then Ubuntu will not be able to gather the drive information it needs to install Ubuntu safely alongside Windows.
If this is the case you will get a prompt to disable BitLocker in Windows before restarting the Ubuntu installer.

Disabling Windows BitLocker is not required when fully erasing Windows or when there is a separate, unencrypted drive available for Ubuntu. For more information see the final section at the end of this tutorial.
если шифрование включено на винде – можно все стереть, а система предупреждает.
7. Ready to install
Regardless of the option you select, clicking Next will take you to a summary of your installation configuration to give you a chance to confirm your setup before clicking Install

Once you proceed, Ubuntu will begin the installation process in the background and you will not be able to return to this point.
продолжаем – точка невозврата пройдена. Теперь Вы с нами и выбрали красную таблетку, Нео!
Russia is OK. no need to ( flee) move to Kazakhstan.. учим английский – лучше для работы, а не как немецкий – у нас запомнился как язык войны. Хальт хенде хох! сис файр донт мув. с Русскими воевать – это самое бестолковое, что можно придумать, это ошибка будет последней. переведите.
8. Choose your Location
Select your location and timezone from the map screen and click Continue. This information will be detected automatically if you are connected to the internet.

после установки часового пояса он запомнится, и будет использован для настроек, точное время берется с Интернета. (можно потом добавить Русский сервер с атомными часами из Пущино – ntp.psn.ru, он обычно работает, н не 100 проц. времени.)
9. Create Your Login Details
On this screen, you will be prompted to enter your name and the name of your computer as it will appear on the network. Finally, you will create a username and a strong password.
You can choose to log in automatically or require a password. If you are using your device whilst travelling, it’s recommended to keep “Require my password to log in” enabled.

заменить Ubuntu user на свой ник англ. буквами.
10. Complete the Installation
Finally you can choose to switch your desktop from Light to Dark theme.

And then sit back and enjoy the slideshow as Ubuntu installs in the background! 

Once the installation has completed, you will be prompted to restart your machine.
как все установится – выполнить перезапуск.
(бывшие Русские военные просили американцев исправить перевод – на винде xp кнопка называлась Пуск, они не хотели ее нажимать. Слишком большая ответственность . Сделали просто окошки! Это не байка, наш программист из Майкрософта подтвердил, да и на 10 винде нет надписи Пуск!)
Click Restart Now.

When you restart, you will be prompted to remove your USB flash drive from the device. Once you’ve done this, press ENTER.
Enter your encryption password if you created one, followed by your user password on the login screen.
And that’s it, welcome to your new Ubuntu Desktop!

вид экрана Ubuntu – все установилось
The welcome widget will help you with some additional setup options, including:
- Connecting your profile to various online accounts.
- Attach an Ubuntu Pro free personal or paid subscription to apply additional security patches to your device (this option is only available when using a long term support [LTS] version of Ubuntu).
- Opting into sending device information to Canonical to help improve Ubuntu (by default, Canonical doesn’t collect device information).
- Activating location services.
- Downloading additional apps from Ubuntu Software.
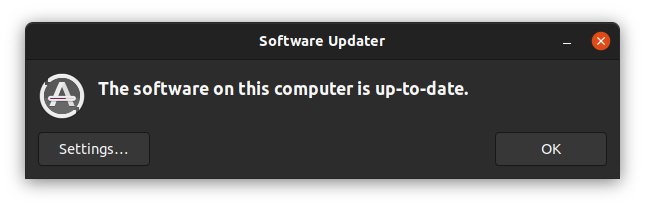
11. Don’t forget to Update!
It’s always good practice to ensure your system is up to date, especially after a fresh install.
The easiest way to do this is via the Software Updater app. Search for Software Updater via the app menu (the icon with 9 squares in the bottom corner of your window) and it will check for updates and apply them.
You can also update Ubuntu using the terminal.
Press CTRL+ALT+T to bring up a Terminal window (or click the terminal icon in the sidebar).
Type in:
sudo apt update
You will be prompted to enter your login password.
This will check for updates and tell you if there are any that need applying. To apply any updates, type:
sudo apt upgrade
Type Y, then press ENTER to confirm to finish the update process.
обновления можно ставить.
в программах – добавить сначала Firefox Chromium – и есть подсказка – пакет офисных программ. Можно и принтер настроить.
12. You’ve installed Ubuntu!
Thank you for completing this tutorial. We hope you enjoy your new desktop.
Check out our picks for Top 10 apps for a fresh Linux install in 2021.
If you have any issues, please contact us via the Ubuntu Discourse, or visit Ask Ubuntu.
You can also read the latest news about Ubuntu Desktop on the Ubuntu Blog.
As a next step, why not try:
For users who need to run both Ubuntu and Windows you can also install Ubuntu via Windows Subsystem for Linux (WSL).
To help us improve our tutorials, please let us know how you got on!
Survey:
I found this tutorial helpful
I found Ubuntu easy to install
Упрощенная установка системы Ubuntu Linux вместо Windows.
да, винду оставить проще, позвав мастера, но возможны варианты.
